Make Your Own Blog - Part 3
By Matt Kinnersley - 27 January 2021
In part two of this series we deployed our new NextJS blog to Vercel and added some styling with TailwindCSS. In this part we are going to add Google Analytics 4 and our own custom Mailchimp signup form. Not only will we be able to keep audience members notified of new blog posts with Mailchimp campaigns, we will also be able to analyse the engagement with our readers with Google Analytics. Armed with this data, we can discover what works and what doesn't.
Mailchimp
Let's start with getting our own custom Mailchimp form. Firstly, we need a Mailchimp account, it's free and easy to get one but there was something that I hadn't factored in when I first went through this process. You need a reliable email address that you can send emails from! It sounds obvious but for me, it presented a new challenge. Mailchimp doesn't allow you to send emails from free email addresses such as Gmail, so you'll need your own domain. I use Google Domains for Tech Waffle so it made sense to get a Google Workspace subscription to go along with it. This gives me an @techwaffle.dev email address that I can use as my 'From' address in Mailchimp. If you also have your own domain, you can add this to your blog by going to your Vercel dashboard.
Now that we have our Mailchimp account and our audience has been generated, let's create a welcome email for new subscribers. In the sidebar, click the 'Create' button. This will give you many options to choose from, the one we want is just called 'Email'. From here, click the 'Automated' tab at the top.
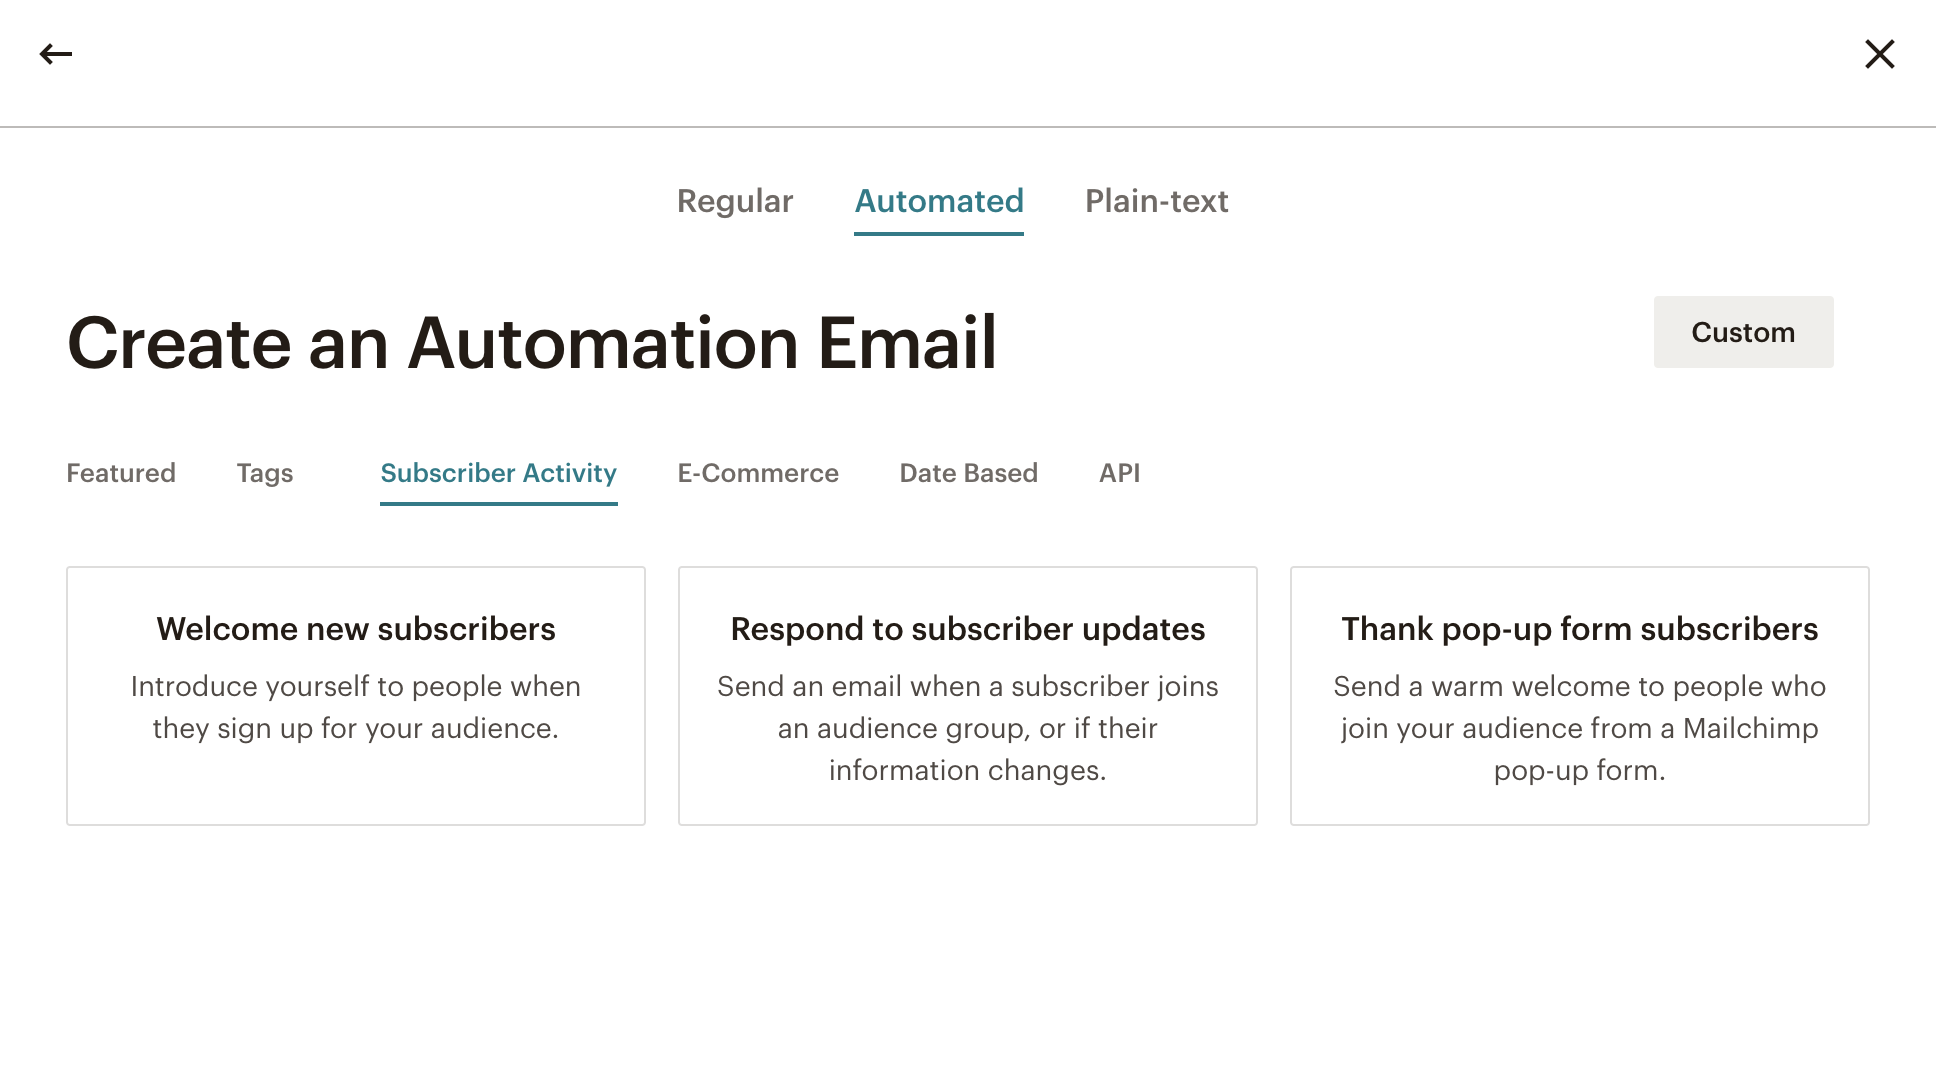
Under 'Subscriber Activity', select the 'Welcome new subscribers' option. Here you can select your audience and continue the setup process. You can design the email however you like. Now that this is done, we can get on with creating a custom signup form. We have the option to use the form that Mailchimp has generated for us and then embed it into our site, but that doesn't give us much flexibility with the design and since we are coding our blog from scratch, that's what we'll do.
Our custom Mailchimp integration will be made up of three parts: a NextJS API route, the Mailchimp marketing Node.js library and a React Hook Form.
API
First, let's start with the API. NextJS gives us the ability to define a Node.js backend within our pages directory. When deployed to Vercel, this backend is run on serverless functions that spin up when called. This is perfect for our use case. To get started, when create a new directory within pages called api. Any file under pages/api will run as a serverless function. Go ahead and create a file called mailchimp.js (or pages/api/mailchimp/index.js) and put in this boilerplate code.
export default function handler(req, res) {
  res.statusCode = 200;
  res.setHeader("Content-Type", "application/json");
  res.end(JSON.stringify({ name: "John Doe" }));
}
If you are familiar with ExpressJS, you will notice the syntax is very similar. For those not familiar, req is your request object. It holds all the details of the incoming request. res, unsurprisingly, is your response object. The methods on this object are used to return data back to the client. Next up, let's install the Mailchimp Node.js library.
yarn add @mailchimp/mailchimp_marketing
With this library we can integrate our Mailchimp audience with our blog. For the purpose of this tutorial, I'll show you a basic example of what this could look like. You will want to add in your own email validation, handle duplicate subscriber requests and store your API keys in environment variables.
import client from "@mailchimp/mailchimp_marketing";

client.setConfig({
  apiKey: "<your-api-key>", // Your API key
  server: "<your-server-prefix>", // Your server prefix
});

export default async function handler(req, res) {
  try {
    const email_address = req?.body?.email;
    // Your list ID
    const response = await client.lists.addListMember("<your-list-id>", {
      email_address,
      status: "subscribed",
    });
    res.status(200).json(response);
  } catch (error) {
    res.status(500).json({
      error: "Unexpected Server Error",
      message: "Sorry, something went wrong, please try again later.",
      log: error,
    });
  }
}
I have hardcoded mock values in this example but there are three key values that need to replaced here:
- API key
- Server prefix
- List ID
To get an API Key for your Mailchimp account, go to your account settings, click 'Extras' and then 'API keys'. Here you can generate a new API key and copy it to your application.
The server prefix can be found in the URL of your Mailchimp account dashboard. It will look something like us7.admin.mailchimp.com, the bit we want is just us7.
The List ID (or Audience ID) can be found in your audience settings. Go to 'Audience' in the sidebar, then 'All Contacts', and finally under 'Settings' click 'Audience name and defaults'. The ID will be under the 'Audience ID' section.
In a production application, all of these variables should be stored as environment variables to keep them secure. In your local environment you can use the dotenv package to load .env files into your Node.js process. To access them in your code, the variables will be available under the process.env object. To get access to these variables from your deployed application, you can add them to the 'Environment Variables' section of your Vercel project settings.
Once this is done, push up your code and watch it deploy your application as it has done before, but this time a serverless function will also be deployed with the endpoint of your file hierarchy, just like with our usual page routes. In our case the API endpoint will be /api/mailchimp. It should be noted pages/api/mailchimp/index.js and pages/api/mailchimp.js both map to the same path.
With our API sorted, let's move on to the form!
React Hook Form
To make our custom signup form, we can use the React Hook Form library. This is my personal favourite form library right now due to it's concise syntax and performant design. It's core motive is to not use controlled components, meaning the input components don't have their values stored in state. This results in the input not having to be re-rendered after every keystroke, improving the performance. Let's take a look at using the library for our Mailchimp signup form.
Install
react-hook-formandaxiosfor making the API call.yarn add react-hook-form axiosImport the hook into your component and create a basic form. You can read about the syntax of React Hook Form from their docs.
import { useForm } from "react-hook-form";

const EmailForm = () => {
  const { register, handleSubmit, formState } = useForm();

  const onSubmit = async (formData) => {
    console.log(formData);
  };

  const { isSubmitSuccessful } = formState;

  return (
    <form onSubmit={handleSubmit(onSubmit)}>
      <div>
        <input
          name="email"
          ref={register({
            required: true,
            pattern: /^\S+@\S+\.\S+$/i,
          })}
        />
      </div>

      <input name="submit" type="submit" />
      {isSubmitSuccessful && <span>Thanks for subscribing!</span>}
    </form>
  );
};

export default EmailForm;
Make a post request to our API endpoint containing our form data.
import { useForm } from "react-hook-form";

const EmailForm = () => {
  const { register, handleSubmit, formState } = useForm();

  const onSubmit = async (formData) => {
    try {
      const { data } = await axios.post("/api/mailchimp", formData);
    } catch (error) {
      console.log(error);
    }
  };

  // ...
};

export default EmailForm;
Now you can test out your form with your email address and see if you get subscribed to your Mailchimp audience!
For this tutorial I have not included any error handling but I highly encourage you to think about the different scenarios your readers might face. React Hook Form has many methods for handling these scenarios such as resetting the form and displaying error messages. From here, we can design our form to look exactly how we like. If you haven't read part two, I go into detail on how to install TailwindCSS, a great library for quickly styling React applications.
With Mailchimp fully integrated, let's move on to setting up Google Analytics!
Google Analytics 4
If you haven't already, use a google account to set up your Google Analytics account. Recently, Google Analytics has moved to version 4 meaning the popular ReactGA library will not work with this version as of yet. Once you have your account and have setup your property, go to the admin settings and grab your gtag installation code. It will look something like this:
<!-- Global site tag (gtag.js) - Google Analytics -->
<script async src="https://www.googletagmanager.com/gtag/js?id=G-ABCD123456"></script>
<script>
  window.dataLayer = window.dataLayer || [];
  function gtag(){dataLayer.push(arguments);}
  gtag('js', new Date());

  gtag('config', 'G-ABCD123456');
</script>
Take this code and copy it into the head of all your pages. Since our blog is a single-page application, we can place it in all pages at once by creating a custom _document.js file. I am going to copy that JavaScript code and place it in its own file, just to clean things up a bit. Within the public directory, I created a js directory where I place scripts I want to load first. Here is the boilerplate for this file from the NextJS docs along with the Google Analytics tag:
import Document, { Html, Head, Main, NextScript } from "next/document";

class MyDocument extends Document {
  static async getInitialProps(ctx) {
    const initialProps = await Document.getInitialProps(ctx);
    return { ...initialProps };
  }

  render() {
    return (
      <Html lang="en">
        <Head>
          <script
            async
            src="https://www.googletagmanager.com/gtag/js?id=G-8QHRB6454Z"
          ></script>
          <script src="/js/ga.js"></script>
        </Head>
        <body>
          <Main />
          <NextScript />
        </body>
      </Html>
    );
  }
}

export default MyDocument;
If we stopped here, Google Analytics will collect some data by default such as when users hit your page, but I want to be able to send custom events when a reader performs certain actions. To abstract some of these, I made some common utilities that I will place around my code at certain points.
export const sendEvent = ({ eventName, data }) => {
  gtag("event", eventName, data);
  console.log(`Google Analytics - ${eventName}`, data);
};

export const sendScreenViewEvent = ({ title }) => {
  sendEvent({ eventName: "screen_view", data: { screen_name: title } });
};
export const sendSignUpEvent = ({ method }) => {
  sendEvent({ eventName: "sign_up", data: { method } });
};
export const sendSelectContentEvent = ({ content_type, item_id }) => {
  sendEvent({ eventName: "select_content", data: { content_type, item_id } });
};
I log each event so I can check everything works as expected. Now that we have these utilities, let's send some events! For each page in my blog, I wrap content in a generic layout component to keep pages consistently styled. This is where I can place a screen_view event for each page using useEffect.
useEffect(() => {
  sendScreenViewEvent({ title });
}, [title]);
This hook runs whenever the title prop of my page changes, sending a new screen_view event whenever someone changes page. Here are some more event triggers I use:
When a user subscribes to my mailchimp audience.
const { data } = await axios.post("/api/mailchimp", formData);
if (data?.status === "subscribed") {
  reset();
  sendSignUpEvent({ method: "Mailchimp" });
}
When a user clicks any of the external links I have in the footer of my blog.
<a
  href={href}
  target="_blank"
  className="transition-shadow duration-300 rounded-md w-min border-2 border-gray-800 flex group items-center p-2 thumbnail-shadow bg-white dark:bg-gray-800 dark:border-yellow-50"
  onClick={() =>
    sendSelectContentEvent({
      content_type: "external href",
      item_id: href,
    })
  }
>
  {children}
</a>
This brings me to the end of this series about making your own blog, I hope it was useful for you! As with any project, I highly encourage you to customise this and make it your own, you will learn so much more by tinkering and playing around with the tools I have shown you.